
Over the years, I have killed some incredible mature bucks over water holes. They can be an absolute magnet in-season and a great addition to any habitat improvement plan.
Unfortunately, when I built some of my earliest ponds, I simply did not do them right.
If you do not execute the construction perfectly from the beginning, you eventually end up with an empty, mucky mess. With disease concerns like EHD becoming a bigger deal every season, elevating your water management to the next level is critical for herd health.
After building and rebuilding numerous ponds over the years, and partnering with folks like Zach Haas with Creek Bottom Land Management, I’ve learned a lot, often the hard way.
Here, I’ve put together a quick guide to help you do it right the first time, or like I did this spring, fix an older watering hole that has started to fail.
Watch the process in this video
Strategic Access
Before you ever start a machine, you have to get the location right.
Placement of a water hole is very property-specific. There’s an entire rabbit hole’s worth of things to consider that we will not be getting into in this particular article, but one thing that often gets overlooked is access to your stand.
Five or six years ago, I began investigating a specific ridge top on my property.
I always wanted a water hole positioned high up on the ridge. Mature bucks love living on top of these high ridges, and a high-elevation water source allows them to drink with the thermal shifts and wind completely in their favor.
It is the ultimate place for a buck to stop for a quick drink when he is traveling and running hard during the autumn rut.
Most importantly, my entrance and exit routes to this specific tree stand location are completely bulletproof. If you cannot slip into the stand and get out cleanly without blowing deer out, the best water hole in the world is useless.
Prepping and Digging the Basin
Once you finalize your strategic location, it is time to stage your materials and prep the ground.
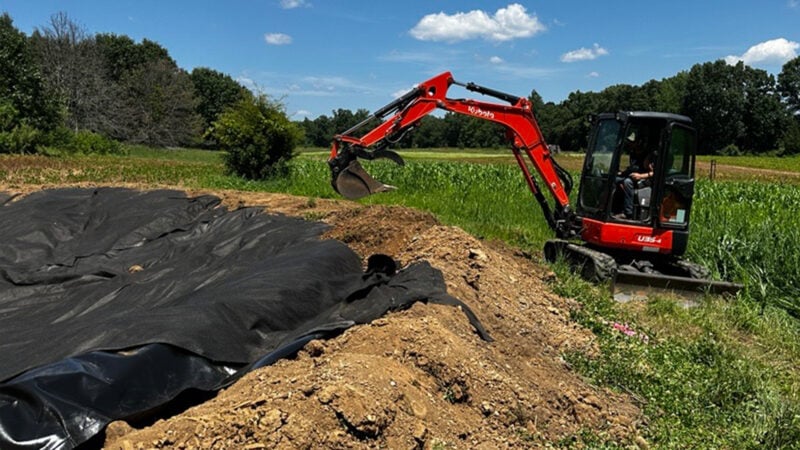
Outline the exact size and shape you want to make the basin. While it can certainly be done by hand, bringing in heavy equipment, like a mini excavator or a skid steer, to clean the area up and dig out the hole will save time, and your back.
If you are redoing an old, failed pond like I did, this step means digging out all of the old liner and nasty muck that has accumulated over the years.
Once the basin is hollowed out with a good overall size and a nice, easy slope for the deer, you need to walk the entire basin floor and manually remove every single sharp stick, root, or rock.
Many guys miss this step. Anything sharp left behind will eventually penetrate your liner once the immense weight of the water sits on top of it, causing the whole system to fail.
Pro-tip: If there’s still some muck left over from the old pond or your new hole gets a little rain before you line it, drop a tarp along the bottom before working on your liner to keep the lining process clean and dry until it’s ready to go.
Liner: The Multi-Layer Sandwich Method
The absolute biggest mistake I made in the past was not protecting the liners, eventually exposing them to the deer.
When droughts hit and the water level drops, deer will naturally walk into the basin to drink. If their hooves contact raw liner, they will slip, slide, and puncture the membrane. Once that liner is punctured, your water source drains out and fails completely.
To fix this, we utilize a strict layering strategy: Felt, liner, felt.
The first layer of heavy geotextile felt fabric can be laid across the entire bottom. This protects the liner from underground root expansion and rocks shifting upward.
Multiple sheets or rolls can be mended together with the “melt & smoosh” method. Overlap the seams 8” or more and use a butane torch to lightly melt the under felt layer and lightly press the top layer to weld them together. This will help prevent the felt from separating and exposing the liner.
Place your pond liner membrane directly on top of that base felt layer. Our Recommendation is the 30 mil AquaArmor RPEL-30 from BTL Liners.
Finally, place a second layer of geotextile felt fabric directly over the top of the liner using the same “melt & smoosh” process to mend the fabric pieces together.
The top fabric layer adds some much needed traction that will not only hold dirt better, but if it does get exposed, it provides whitetail’s hooves something to grab onto so they won’t slip like they do on exposed liner.
The Termination Trench and Finishes
Another big mistake I was making in the past was failing to properly terminate the edges of the liner.
To keep the entire liner assembly from slowly pulling down to the center of the hole, you must dig a termination trench.
- Cut a six-to-eight-inch trench entirely around the outer edge of the pond basin.
- Tuck the outer edges of the felt and rubber layers deep into this trench.
- Backfill it with packed dirt.
This anchors the system permanently to the hillside.
Once anchored, add a clean two-to-three-inch layer of topsoil over the the top felt liner. This gives the deer a natural, high-traction surface to step on, even if the water level fluctuates.
Finishing Touches
Finish the project by packing the edges down and seeding the raw dirt. Vegetation will help keep your dirt in place and minimize washouts during big rainfalls and can be a food source attractant as well.
I like to use a highly shade-tolerant seed blend from our friends at RakkFuel called Show Time along the pond perimeter. It is a specific blend that establishes a strong root system and grows beautifully under heavy tree canopies where standard clovers fail.
Pro-tip: If you have concerns about EHD in your area, or just want to keep your pond healthy, consider treating the pond with EHD-fense. This 3 part, all-natural water treatment system improves water quality and eliminates the muck that EDH carrying midges live in.
Final Thoughts
If you’ve wanted to add a pond, or have a failed water hole on your property that you have been putting off, make it a priority on your management list this weekend.
Follow these steps, build it right from the start, and you will create an absolute hotspot for the upcoming fall.
By