LAST UPDATED: May 8th, 2015
We’ve all heard that you can’t judge a book by its cover and the same goes for canned venison. The first couple jars of canned venison that were given to me were re-gifted faster than you can say, “Oh, gross”. Through some constant nagging and prodding from a friend, I eventually tried it just to silence him and found out that canned Venison doesn’t belong in the same category as a holiday fruitcake, in fact it is one of my favorite ways to enjoy deer meat now. I use it in stir fry, on noodles or rice or mix it up and make a sandwich spread with some mayo and relish or spread it on crackers. I even throw it in my chili. Actually canned venison is probably the most versatile way of processing deer meat.
First let’s look at some of the benefits of canning venison. No freezer space is needed. That may or may not be a big deal to you but if you lose your power for a few days I bet it will quickly become a big deal not to mention how nice it is to have meat on a camping trip when your cooler is filled with other things. It’s already cooked so heat it up if you want a warm meal and don’t if you’re in a hurry and just want it on crackers or bread. Venison is already one of the leanest red meats on the planet but canning will help separate what little fat it has from the meat. Open the jar and you can easily remove any fat because it’ll be separated out and resting on top of the meat.
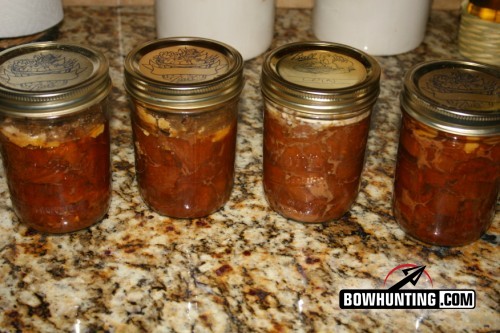
Canned Venison is not a pretty sight.
Okay with that said, let’s be honest, the first time you look at a jar of canned venison, elk, moose or any meat including beef, you’re probably going to turn up your nose and say no thanks. That would be a huge mistake on your part. Let me take the place of my nagging friend and try to prod you into giving it a try. I just wish I could whip up a plate of beef tips (canned venison) with gravy on a bed of rice or noodles for you to taste. I can almost guarantee you’d love it and ask for more. Canned venison really will taste like tender delicious beef tips. I’m not sure what else I can say to convince you to give it a try. I practically had to be forced into trying it because I judged it on appearance only.
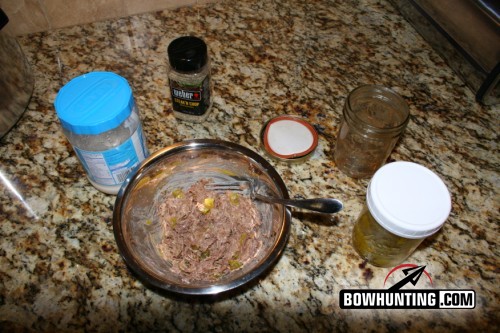
Venison sandwich spread is just one of the many ways you can enjoy canned venison.
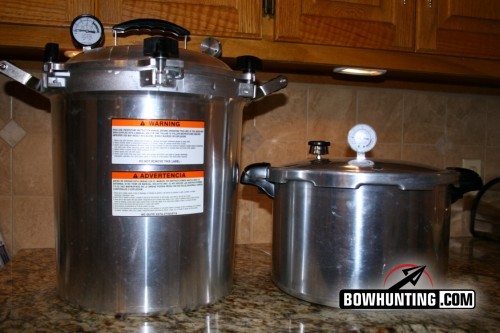
So if you’re open to the idea of canning venison, here’s what you’re going to need to get started, a knife and cutting board, some venison, canning jars, some salt or au jus concentrate and a pressure cooker. The pressure cooker is a must; you can’t get by with a regular water bath canner. That part is non-negotiable, it’s a safety thing. For more information on the whys, go to the National Center for Home Food Preservation on the University of Georgia website. In short, you can’t reach the necessary temperatures (240º – 250º) to safely preserve the meat without a pressure cooker. Before you go out and buy one, think about borrowing one from a friend that does some caning. They’ll be done canning long before you’re going to need to borrow it. If you think this is something you’d like to do you could keep your eyes open for a pressure canner this summer at garage sales. You can buy replacement gaskets at most hardware stores.
The actual process is very pretty simple but there are guidelines that must be followed in order to have a safe finished product. Since water will boil lower temperatures at higher elevations, increased pressures are required to attain the safe temperature range. Make sure you know your elevation and refer to the table at the website I mentioned in the previous paragraph. My elevation in eastern Nebraska is just over 1,000 feet and I have a dial gauge on my canner so I must reach a minimum of 11 lbs in order to achieve the correct internal temperature. Its okay to exceed the prescribed pressure slightly but do not let this pressure drop below or you will have to reached the pressure again and restart your timer.
I cube my venison in small pieces approximately 1 to 1 ½” and cut off any visible fat or silver skin. I add a teaspoon of au jus concentrate in the bottom of a clean canning jar that I just removed from the hot dish washer and pack the cubed pieces of raw venison tightly until there is only 1” of space to the top of the jar. In canning talk this is referred to as head space and it is one of the prescribed standards in this process so don’t ignore this step. Although I use au jus concentrate you can substitute with one teaspoon of salt or another spice or add nothing at all. Do not add any liquid such as water or broth. I wipe the top of the jar with a clean towel and place the lid and band on tightly.
I add 3” inches of hot water to my pressure cooker (check the manufactures recommendations for your pressure cooker) and pre-heat to just under 140º. I then place the jars in the water leaving a small amount of space between the jars. Once all the jars are all positioned and the pressure cooker lid is secure, raise the temperature to high and leave the vent open. After the water begins to boil and a steady stream of steam is rapidly venting out of the vent hole in the top of the lid, start timer for 10 minutes. This is to ensure all air pockets are removed from the inside of the pressure cooker. After ten minutes, carefully place the counterweight over the vent and watch the gauge rise as the pressure begins to build. Once the prescribed pressure is attained, regulate your heat to maintain this pressure and start a timer.
Pint jars must be heated for 75 minutes and quart jars for 90 minutes. I personally don’t use quart jars for canned venison but if you have a larger family you may want to. After the time is up, turn off the heat and let it cool off naturally. This cooling part will take quite a while but it’s important that you do not try to speed the cooling process up. Even after the gauge shows zero pressure be careful when you remove the counterweight as there still could be a little pressure remaining. Carefully remove the jars without tilting them and place on a cooling rack and let them stand for 12 to 24 hours. Check each lid to make sure it sealed and if not, place the jar in the refrigerator and use this within a couple days.
If you want to get some practice in on this process before this fall, consider trying chicken or beef using the same process. I love canning chicken breast and using it for stir fry or chicken salad. If you’ve never canned before, after trying this and finding out how easy and fun it is you may want to give salsa making a try. I have a great recipe that I may share in an upcoming blog. In closing, please refer to the National Center for Home Food Preservation at the University of Georgia website to make sure you’re doing this correctly since safety is essential anytime you work with food. Good luck canning your venison!