LAST UPDATED: May 11th, 2015
There is an old cliché amongst deer hunters that following the harvest of a whitetail, “the real work begins.” This is undoubtedly true; first there is the emotional roller coaster of following a blood trail. Once we’ve recovered fallen animal, then comes the field dressing, the sometimes rigorous drag out of the woods, then if you process your own meat, you must butcher it as well.
Combine all of the above with countless hours you have spent in the winter scouting, with shed hunting and establishing food plots in spring, glassing and hanging stands in the summer heat, and of course chasing mature deer all fall and you have invested so much time in pursuing your passion that you sometimes forget to celebrate and honor the animal.
I can think of no better way than to achieve this than to take quality harvest pictures. It is a major pet-peeve of mine to see a trophy buck thrown in the bed of a pickup truck or a hunter standing over an old matriarchal doe holding her up by her ears. I believe such pictures reflect poorly on the hunting community. All it takes is a little extra time and effort to take a great harvest picture, because after all, it took a lot of time and effort to put that animal on the ground.
My favorite position to place a deer in for a harvest picture is simulating the deer bedding down. Simply fold the front and back legs under the animal and position them as to support the entire deer. If done correctly, the legs will support the entire deer without the hunter having to lean on the animal or push on it to keep it up right. This position best hides the hunter (I prefer the focus to be on the animal) and intensifies the deer’s body and size. It is also important for the photographer to be eye level with the deer, or at a slight upward angle. This not only does great justice to deer’s body size but also makes the deer the primary focus of the picture.
Once the deer is in the “bedded down position” there are several different ways to make your deer appear unique. Of course if it is a buck, make sure to hold him up proudly by his antlers. I advise, however, not to hoist his head up too far, as this stretches the deer’s neck and makes him appear long and lean as opposed to big and stocky.
The next step I take is removing as much blood from the deer and surrounding areas as possible. As bowhunters, we love massive blood trails created by devastating broadheads, but having blood around the mouth or the entrance and exit wounds make for a tasteless picture. To remedy this problem, I always carry a bottle of water and old rags to help clean up. The rags are great for removing blood off the body and mouth, and the water helps smooth down matted hair that may have bunched up if the animal lies down awkwardly before expiring. I also make it a priority to put the tongue back into the deer’s mouth.
After the above steps have been taken, feel free to be creative. I try to add as much color as possible to the pictures to make it more pleasing to the eye. If this means dragging the deer a little out of your way to place in front of the scarlet sumac leaves or the sunshine yellow foliage of a hickory tree in mid-October, so be it, and you’ll be pleased with the results.
I’m also a fan of adding “props” into a picture. For example, if you shot an old buck that you were fortunate enough to find his sheds from the previous years, go get those sheds and lay them in front of your trophy, it gives the picture character. Or perhaps you discovered some fresh sign during the peak of the rut, so you decided to slip a climber on your back, hunted that spot immediately and tagged the buck leaving you the clues; position your stand in the background to add a story within the photo.
It doesn’t take a genius to take a quality harvest photo, just some time, effort and little creativity. Since this article is devoted to photography, I find it quite useless to waste any more time with words, instead, enjoy my brother and me in our harvest pictures from the 2009 season.
.jpg)
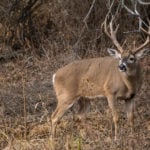
My brother, Damin, normally would not have harvested this buck because of its lack of age and size. Still, the young buck sported an impressive spread as evidenced by this picture. By placing the buck’s head beside Damin’s body, one can better realize the buck’s spread.
.jpg)
This old doe fell victim to my brother’s rifle in late November. I inserted myself into this picture because I was able to capture Damin stalking to within 50 yards of this deer on film. Also, notice the sorghum stalks in the background. We drug this deer 200 yards uphill to where this doe was shot, because the sorghum was instrumental in attracting and holding deer on our property in 2009.
.jpg)
This 2 year old buck was fatally wounded when he crossed paths with my brother in late November. It had been shot in the brisket and was bleeding profusely from it’s mouth and chest. We cleaned him up and treated him just as we would a Pope and Young Class buck.
.jpg)
Unfortunately, it was a warm November morning when I delayed the recovery of this big doe. She stiffened up badly and her eyes glassed over. Luckily, the beige leaves of the American Beech trees provided a beautiful backdrop and by hiding behind the log, I was able to salvage the situation and came away with a solid photo.
.jpg)
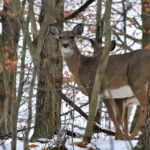
I particularly enjoy the simplicity of this harvest picture. The white snow contrasts so sharply with the blackness of night that the picture focuses solely on the deer.